 Now that the weather is starting to warm up and spring is here, a turkey hunter’s thoughts turn towards chasing turkeys. It’s often a lot of work to get that big tom into shotgun range. On top of that – these birds are tough to put down! You want to do everything in your power to make sure that when the opportunity presents itself that you’re able to get the job done quickly and cleanly. Turkey patterning is probably the least fun part of turkey hunting. These turkey loads pack a wallop! But it is an important duty of yours as an ethical turkey hunter to do what you can to make a clean kill. Here are a few tips to get you started and make the process more efficient.
Guns:
Most people who hunt turkeys do not have a customized turkey gun. Rather, most use guns that they already use to hunt ducks, geese, pheasants and other small game. The most common setup for hunting turkeys is a 12 gauge shotgun, which shoots 3 inch shells. But there are hunters out there using 2 ¾” 12 gauge, 3 ½ inch 12 gauge, 10 gauge, 20 gauge, 16 gauge and black powder shotguns. All will do the job on a turkey, given the hunter knows the limitations of their firearm and only takes shots within the gun’s ability.
The little 20 gauge has really gained popularity over the past few years for turkey hunting. So much so, that many ammo manufactures now make multiple 20 gauge turkey loads. Velocity has never been the issue with the 20 gauge loads. Instead, the issue was trying to get the smaller payload to hold together long enough to provide an acceptable pattern at longer distances. With the new chokes and ammo choices available to hunters today this is no longer a problem, out to 40 yards and beyond.
Chokes:
Generally, with turkey hunting, you’re trying to put a lot of shot into a small area. Like I mentioned earlier, these birds are tough to kill. Your most effective way of harvesting one is getting multiple head/spine hits. We’ll go into more detail later, so you’re looking for a choke for your gun that will give you a tight pattern for 30-40 yards. If your gun has a fixed choke, you’re kind of stuck. You job is to find the ammo that’ll give you the best pattern with the existing gun choke combo. If your gun has a removable choke, you have more flexibility. But you’ll still need to find the best ammo for your gun choke combo through trial and error. Every gun is different. Even if you have the same exact gun as you buddy does, it doesn’t mean you’ll get the same results with the same combo. But it does give you a starting point.
Generally aftermarket chokes made specifically for turkey hunting will outperform the factory choke your gun came with. There are always exceptions, but generally this will be the case. Turkey chokes vary greatly in quality and price. You’ll find turkey chokes ranging in price from $12.99 to $200. That’s a big range in price. Most chokes will, however, be in the $25 to $55 range. Some have porting, some don’t. Most extend beyond the barrel end 1-2 inches and some are flush mounts. It’s also important to make sure to know what type of shot your choke is rated for. Most will be rated, ‘For Lead Shot Only’. In these chokes, do not shoot the tungsten alloy shot as these loads will not be safe in a lead only choke. A general rule is that the tighter the choke the smaller shot it will group tightly and vice versa. But you’ll never know for sure until you pattern them yourself.
Ammo:
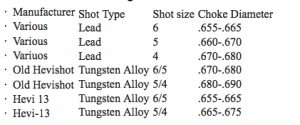
So many ammunition options out there now for turkey hunting that it’ll make your head spin. All the major ammo manufacturers have both lead and nontoxic shot loads available. Most of these nontoxic loads are Tungsten alloys but there is Bismuth shot loads as well. The nontoxic loads are more expensive than lead, but also carry more downrange energy than lead of the same shot size. You be spending 3-5 times as much per box of the nontoxic loads and up to 10 times as much for the custom nontoxic loads. Here are a few common ammo choices and what typically works best.
 Like I mentioned, the tighter chokes will shoot smaller better in most cases. Here are some starting point numbers that typically hold true in 12 gauge guns with a standard bore.
Here is some additional information on loads to consider while patterning. The Winchester Elite loads like a choke, similar to lead loads typically. The Federal Cartridge Flite Control loads typically shoot best out of non-ported chokes.
Another consideration of shot size is pattern density versus knockdown power. With smaller shot there are more individual shot to fill in a denser pattern. The downside is that they also lose energy quicker than the larger shot. Generally 2.5 ft/lbs of energy is the accepted energy level for penetrating skin and bone, required to cleanly harvest a mature tom. In lead shot #6 shot falls below that level just past 35 yards, #5 lead at 40 yards and #4 shot about 45 yards in turkey shells pushing a heavy payload. You’ll pick up a 3-4 yards with the high velocity lead loads and an addition 7-8 yards with the Tungsten alloy shot.
Patterning Session:
I pattern at my local gun club but as long as you have a safe place to shoot with a backstop 50-65 yards out, it will do. A solid rest with some sandbags is also nice to get a good bead for getting that pattern centered just right. You’ll need lots of turkey head targets. You’re looking for those with the spine and skull shown. Anything else is just for an aiming point. I print mine out on 8 ½”x11″ sheets of paper and bring a roll of freezer paper along to see the big picture in regards to the pattern and a sharpie marker. If you have a few friends along then each bring a few boxes of different loads; it makes it a lot easier on the bank account. Safety is top priority. Make sure you have good hearing protection. Shooting glasses can be a good idea as well. These guns really kick so make sure to either wear a thick jacket or fold up some carpet and place it between the butt of the gun and your shoulder. It will make the session much more pleasant.
Bring some game or trap loads along. Use these until you get your pattern centered where you want it. Not need to pound your shoulder at this point. Start out at 15 or 20 yards. Put up your freezer paper and draw a small bullseye for an aim point. Carefully squeeze off two of the target loads at the bullseye. Now, check it out and determine where your gun is hitting – left, right, high, low – and if you have an adjustable sighting setup (scope, red-dot, iron sight), this is where you make the big adjustment to the point-of-impact. Now take another of the big blank targets and tape a turkey-target in the center. Place it at 30 yards and fire one of each of the turkey loads you wish to evaluate, each at a fresh turkey-target. Label each used target with the gun, load and choke tube used, as well as the distance, date, etc. for comparison later.
Certain loads will rise to the top, and these are the ones you should keep for the next level. Then take these best loads and move the target another 5 yards further away. As the distance increases, a load or two will likely separate itself. You keep moving the target out until you end up with a minimum of 20 pellets solidly in the head/neck outline. I also use a minimum of 8 in the bone as a rule of thumb, in addition to the 20 in the head and neck. When you find that distance where you hit that, it will be your maximum distance – unless it’s beyond the load’s acceptable distance based on retained energy. Just because you can punch a dandy pattern through paper at 50 yards with #6 lead shot doesn’t mean there’s enough knockdown energy there to cleanly kill your tom at that distance with that load.
Then, when you’re done, just pat each other on the back for a job well done. Just make sure to avoid that shooting shoulder though. It might be a little tender.