-
Your Responses - Share & Have Fun :)
-

By smurfy · Posted
is 3 weeks away............who's going and where???? i skip the first week and i'll head up to the cabin the 2nd week. ussually fish smaller lakes. -
-
-

By SkunkedAgain · Posted
I might have missed a guess, but here are the ones that I noted: JerkinLips – March 27th, then April 7th Brianf. – March 28th Bobberwatcher – April…. MikeG3Boat – April 10th SkunkedAgain – early April, then April 21st Definitely a tough year for guesses, as it seemed to be a no-brainer early ice out. Then it got cold and snowed again. -
-
-
-
-
By CigarGuy · Posted
So, that was you in the camo lund? I'm bummed, I have to head back to the cities tomorrow for a few days, then back up for at least a few weeks. Got the dock in and fired up to get out chasing some crappies till opener! -
.thumb.jpg.5c1a86e9339e49e53f5bfefed2220054.jpg)
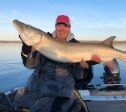
By LakeofthewoodsMN · Posted
On the south end... Lots of ice on the main basin, but it is definitely deteriorating. Some anglers have been fishing the open water at the mouth of the Rainy River in front of the Lighthouse Gap. The rest of the basin is still iced over. Pike enthusiasts caught some big pike earlier last week tip up fishing in pre-spawn areas adjacent to traditional spawning areas. 8 - 14' of water using tip ups with live suckers or dead bait such as smelt and herring has been the ticket. Ice fishing for all practical purposes is done for the year. The focus for the basin moving forward will be pike transitioning into back bays to spawn, This is open water fishing and an opportunity available as the pike season is open year round on Lake of the Woods. The limit is 3 pike per day with one being able to be more than 40 inches. All fish 30 - 40 inches must be released. With both the ice fishing and spring fishing on the Rainy River being so good, many are looking forward to the MN Fishing Opener on Saturday, May 11th. It should be epic. On the Rainy River... An absolutely incredible week of walleye and sturgeon fishing on the Rain Rainy River. Walleye anglers, as a rule, caught good numbers of fish and lots of big fish. This spring was one for the books. To follow that up, the sturgeon season is currently underway and although every day can be different, many boats have caught 30 - 40 sturgeon in a day! We have heard of fish measuring into the low 70 inch range. Lots in the 60 - 70 inch range as well. The sturgeon season continues through May 15th and resumes again July 1st. Oct 1 - April 23, Catch and Release April 24 - May 7, Harvest Season May 8 - May 15, Catch and Release May 16 - June 30, Sturgeon Fishing Closed July 1 - Sep 30, Harvest Season If you fish during the sturgeon harvest season and you want to keep a sturgeon, you must purchase a sturgeon tag for $5 prior to fishing. One sturgeon per calendar year (45 - 50" inclusive, or over 75"). Most sturgeon anglers are either a glob of crawlers or a combo of crawlers and frozen emerald shiners on a sturgeon rig, which is an 18" leader with a 4/0 circle hook combined with a no roll sinker. Local bait shops have all of the gear and bait. Up at the NW Angle... Open water is continuing to expand in areas with current. The sight of open water simply is wetting the pallet of those eager for the MN Fishing Opener on May 11th. A few locals were on the ice this week, targeting pike. Some big slimers were iced along with some muskies as well. If you like fishing for predators, LOW is healthy!
-
Recommended Posts
Join the conversation
You can post now and register later. If you have an account, sign in now to post with your account.
Note: Your post will require moderator approval before it will be visible.