Jump to content
  • GUESTS

    If You  want access  to member only forums on FM, You will need to Sign-in or  Sign-Up now .

    This box will disappear once you are signed in as a member.

  • 0

Trailer Wiring 101


Jeremy airjer W

Question

The trailer lights are giving you trouble and you’re not sure where to begin. The first thing you need to determine is what is or is not working. There are two things that will make your lights work incorrectly. One obviously is the lack off power which will result in everything working except for one light. The other is grounding issues which will usually cause strange things to happen.

Power Issues

This first part will deal with power issues. Our objective is to narrow down the possibilities until we have isolated the problem. The information below already assumes that you have checked or replaced the bulbs just incase they where burnt out.

The first thing I want to do is find out if it is the truck or the trailer. The simplest way to check the truck is with a test light.

testlight.jpg

Since most of us use a four flat style connector I will be basing everything on that. Whether it’s an aftermarket four way connector or a 7 pin to four adapter the male terminal on the four way connector on the vehicle is the ground. Simply hook the test light to the ground then turn on the trucks lights and four way flashers and probe the other three terminals. If the other three terminals light/flash the test light than you can be reasonable confident that the vehicle side of the wiring is fine.

What if one of the terminals does not light up the test light? If it’s an aftermarket harness and everything else on the truck is working than the harness itself may be at fault since the aftermarket harness uses the same power that is provided to the lights on the vehicle. If it’s a factory wiring setup than the fuses are first on my list of things to check. Typical factory trailer wiring will have there own fuses for each function of the trailer wiring.

What if all the terminals don’t illuminate the test light? My first thought is bad ground. We have all had some pretty shady looking connectors and if there green they aren’t going to work.

corrodedplug.jpg

If there clean then I would try finding another way of grounding the test light and rechecking the three terminals (when finding another ground source it doesn’t hurt to make sure it is a good ground by checking a wire that you know has power to it to make sure the test light lights up). If the test light lights up then we know we can concentrate on the ground if the test light still doesn’t light up then we need to dig a little deeper into the aftermarket harness or there may be a problem with the 7 to 4 adapter. If you suspect the adapter you can remove it and check the running light, left turn and right turn pins on the seven way connector. If they work at the 7 pin, than the adapter is likely your problem.

7pin.jpg

So the truck checks out fine. Now what? The first thing I would do is look at all the exposed wiring on the trailer. Some things you should look for are broken wires, pinched wires, corroded connections, and bare wires. Connection made with either wire nuts or scotch locks should also be looked at carefully as many times they can be the cause of the failure since they do not “seal” out the elements which allows the wires to corrode.

wirenut.jpgscotchlock.jpg

Also pay close attention to the lead buttons on the bottom of the bulbs. I have run into many of these where the buttons have worn out and causing them to loose contact with the socket. In this case the buttons have worn enough that they are touching, the symptom was that the brake lights would be on as soon as the customer turned on the tail lights.

bulbterminals.jpg

More often than not trailer lighting problems can be resolved by repairing one of the problems mentioned above.

If the wiring looks to be in good shape, than the next step is to check for power at the socket. Again the simplest way is to use a test light. Socket for the tail/brake light will have two contacts on the bottom. One will supply power when the brake/turn signal is applied and the other when the lights are turned on.

taillight.jpg

(Photo courtesy of Shackbash)

If there is no power than its as simple as tracing that circuit back until you find the source of the power loss.

Ground Issues

So your trailer lights are acting weird one light blinks opposite the other when it’s not supposed to. When you step on the brakes all the lights go out. The lights are really dim. The lights flicker when traveling down the road. These are all possible ground issues and are not that hard to figure out.

The first thing I do when I suspect a bad ground is hook up a test light to a known good ground on the vehicle (preferable the negative battery terminal using a long jumper wire). Next, with the trailer plugged in to the vehicle and with the symptom present, touch the test light to the trailer (preferable a clean metal surface). If the test light at any point lights up then there is a main ground issue with the trailer. Usually between the trailer plug-in and where the white wire is attached to the trailer. Make sure that the area where the white wire is attached is clean and corrosion free, as well as the wire and/or connector. A star washer does a good job between the wiring terminal and the trailer frame to make a good ground contact, or in between the washer and the nut on the back of the taillight.

trailergrounds.jpgmainground.jpg

(Photo courtesy of Shackbash)

There still can be isolated ground issues that will not light up the test light in the scenario above. This could be anything from a corroded socket, poor contact between the lens assembly ground post and the trailer, or the socket ground wire and the trailer. All of these can be checked buy using a jumper wire to a good ground and then grounding the suspected component to see if the problem corrects itself.

tailightmounts_grounds.jpg

(This lens assembly uses the mounting bolts to ground itself to the trailer - Photo courtesy of Shackbash)

Most trailer lighting issues can be solved with simple repairs. Remember to start with the simple things first.

-Identify any and all issues that may be present.

-Determine if the source of the problem is the vehicle or the trailer.

-If it’s the vehicle check fuses and connections

-If it’s the trailer check the wiring, bulbs, sockets, and connections

-Make sure there is a good power supply and a good ground. These are the two most common problems.

Special thanks to Shackbash, Marine_man, and 4wanderingeyes for there help!

Link to comment
Share on other sites

  • Answers 195
  • Created
  • Last Reply

Top Posters For This Question

  • Jeremy airjer W

    51

  • SpecialK

    8

  • amateurfishing

    8

  • Craigums

    7

Recommended Posts

  • 0

So you have found a problem with a wire or you decide you need to install a new four pin connector, this should help make your install/repair a little easier and help your connections last a little longer.

There are two good ways to repair wire, self sealing butt connectors and soldering. Soldering is the ideal repair but requires a little more time, patients, and a little practice. The self sealing butt connectors are a lot easier but can be more prone to problems in the long run.

In this case I am hypothetically installing a new four way connector to a trailer harness. Note that I have staggered the cuts on the wires.

wiresstaggered.jpg

This serves two purposes. Even if the shrink wrap or the insulation on the butt connectors rubs through the connections are far enough away from each other that the possibility of the connections touching is reduced and once all the wires are reconnected there won’t be a big ball of connections in one spot.

Let’s start with the simplest repair, the self sealing butt connector.

crimpcoonector.jpg

The most important thing about using these is using the correct size for the size of wire you have. Too small and the wire won’t fit. Too large and it won’t seal around the wire allowing moisture and inevitably corrosion to form resulting in a failed connection.

The first step is to strip off about ¼ to 3/8 of an inch of the insulation off the end of the wire.

crimpstrip.jpg

Next insert the wire into the connector and crimp.

crimp.jpg

Give the wire a good tug to make sure it is secure in the connector.

crimpcomplete.jpg

Use heat to shrink the tubing around the wire. If everything is done correctly you will see a ring of “ooze” come out of the connector and essentially seal itself to the wire.

crimpshrink.jpg

Soldering is way more time consuming but way more reliable. There are two ways to solder wires together, a butt type connection and a twisted wire connection. Either way is acceptable and both require a little experience with a soldering iron. The iron needs to be at the right temp so that it can transfer enough heat to melt the solder into the wire but not too much that it overheats the solder. Overheated solder will have a dull finish and is undesirable. The other thing to remember is use small diameter solder so that the amount of heat lost in the melting of the solder is minimized.

For a butt connection you’ll start by stripping off about 3/8 of an inch of insulation of both pieces of the wires to be joined. Next you will need to tin the wires. Apply a little solder to the iron and hold the iron on top of the wire.

tinning.jpg

You will see the solder move from the iron to the wire. As soon as that happens hold the solder to the wire. The solder will begin to melt into the wire. As soon as the entire exposed surfaced is covered the tinning process is done. When both wires have been tinned they are ready to be joined. Make sure you place a section of shrinkwrap over one of the wires before you join them! Place the wires so the tinned ends overlap each other and apply heat with the iron.

buttjoin.jpg

You will see the solder from both tinned ends join together. As soon as that happens remove the iron and let cool for a second. The finished joint will look like this.

buttcomplete.jpg

Move the shrink-wrap over the joint, shrink it, and it’s complete.

Link to comment
Share on other sites

  • 0

Next we have the twist version. You’ll need to strip back between an inch to an inch and a half of the insulation off of the wires to be joined. Again remember to add you shrink-wrap before you join the wires.

twistedstrip.jpg

Twist the two wires together as tightly and neatly as possible.

twisted.jpg

Apply a small amount of solder to the iron and then hold the iron to the top of the wire. This is similar to tinning as described above but it will take a little longer to get the wire hot enough. As soon as you see the solder starts to transfer from the iron to the wire hold the solder under the wire. The solder will start to melt into the wire. Continue to add solder and move the iron across the exposed wire until the entire connection is covered.

Twistsolder.jpg

Cover the joint with the shrink-wrap and shrink.

Both ways of soldering will provide good joints. I mostly use the butt connection because it is ideal for most of the tight situation I have to solder in. It’s also ideal if you don’t have a lot of wire to work with,

Link to comment
Share on other sites

  • 0

Heres a couple quick reference guides.

wireroutingdiag.jpg

wireid-2.jpg

  • Thumbs Up 1
Link to comment
Share on other sites

  • 0

Man this is some great info! I have a 2002 toyota tundra and just can't seem to get the lights to work. The trailer lights do work with my other truck so it's the tundra tried the bid fuse on the battery but nothing- tried cleaning everything nothing....need help...please

Link to comment
Share on other sites

  • 0

What specifically does not work?

If there is no power out of the seven pin on the truck than follow the harness back to the two connectors. Unplug them and there will be a strong possibility of a lot of corrosion in them. I have run into 2 Tundras with this problem. One I was able to clean and reconnect after generously applying di-electric grease to all the terminals. The other I ended up removing the connectors and hard wiring the harnesses together.

Link to comment
Share on other sites

  • 0

This is great info and just in time as I'm going to put new lights on. I'm going the solder route for sure. Quick question for you, what do you do when you need to add the side lights to the brown wire? I assume you cut the wire and then twist or solder all three ends together and then let the shrink do the work? Just wanted to make sure.

Thanks to all who contributed to this great info, it's a huge help.

Link to comment
Share on other sites

  • 0

Keep your splices to a minimum! If your installing conventional lenses (not led) I would and have run extra wires that I have soldered to the taillight tangs (for lack of a better word). In the photo of the lens assembly that I have labeled with power(s) and grounds you can see the wires attached to the tangs. I always solder them to the tangs and then cover liberally with liquid black tape. You can then run the additional wire on each side back to the side markers. As long as you have the lens off it wouldn't be a bad idea to liberally coat the socket area with di-electric grease to prevent those areas from corroding.

I installed a new light kit on my father in laws trailer several years ago. Everything was soldered, shrink wrapped or liquid black tapped, and heavily greased. Besides an occasional burned out bulb it hasn't failed yet!

Link to comment
Share on other sites

  • 0

Keep your splices to a minimum! If your installing conventional lenses (not led) I would and have run extra wires that I have soldered to the taillight tangs (for lack of a better word).

So what do you do if you are installing LED? That's what I picked up today.

Link to comment
Share on other sites

  • 0

I haven't had the opportunity to install a set of LED's yet. Sorry Sandmannd. If I get a chance I'll swing by Northern to see how there set up.

Link to comment
Share on other sites

  • 0

Excellent post Jeremy. At work we switched over to led lights on the trucks and I don't remember anyone mentioning anything different on them. Just solder like standard lights. I am a big fan of solder.

Link to comment
Share on other sites

  • 0

AirJer, great info. Wondering your thoughts on using the liquid electrical tape instead of heat shrink tubing? I've never had the best luck with heat shrink tubing and went completely away from it on my stuff and just use this liquid tape which so far seems to be working wonderful.

One thing I'd add from a non-pro's perspecitve, a complete new wiring harness for a trailer is really no harder than trying to find a problem and then trying to correct it. Then you know everything is good and your "old but repaired" stuff won't just have another problem next time out. That may be just me, but pretty much whenever I get into problems with my trailers, I just pull a new harness and rather than messing with the existing wires. This, of course, would be at the stage after the test light processes...

Again, great info!

Link to comment
Share on other sites

  • 0

I found this on L.E.D's. I know it does not say much about 12V trailer stuff, but gives you an idea of what goes into an L.E.D. systems.

LED Circuitry Tutorial

1stled.jpg

Circuitry 101: How to Hook Up LEDs

Below we've created a very basic guide to help people unfamiliar with circuits get their LEDs up and running without blowing them out and wasting all their money. IT IS VERY BASIC!! Current is hardly ever mentioned, not because it's not important, but because we've found it makes things confusing when trying to teach people about this sort of thing. If we've done a bad job explaining things or if you have a question this doesn't answer, use the contact form at the bottom of this page to let us know what's up.

There's two basic types of circuits: Series and Parallel.

Series or "How do I power lots of LEDs off a higher voltage source?"

When LEDs are placed in a series, the voltage is dispersed between the LEDs, meaning less voltage goes to each LED. This can be very useful. For example, if a 12 volt adapter were powering one LED, there'd be 12V going through that LED which is way too much for any LED to handle and would result in a rather unpleasant burning smell.

However, if you take that same 12V power source and put 4 LEDs in series, there would be 3V going to each LED and (assuming the LEDs are made to run off 3V) each would be powered and just dandy. Check out this illustration:

series101.jpg

It's important to notice how the LEDs are positioned: (-) (+), (-) (+), etc. making sure that the end (-) connects to the (-) wire and the end (+) connects to the (+) wire, if any LEDs are backwards nothing bad will happen, they just won't turn on.

If three LEDs were in series with a 12V source, each would receive 4V, if six were in series, each would receive 2V, etc.

"But what if I have four LEDs powered from a 12V source and I want each to receive less than than 3V/ea?" This is where the little 'Resistor(s)' squiggly comes in. By adding a resistor it's possible to tone down the amount of voltage each receives. To find out what value resistor you should use, use an led calculator such as this one . Go to the middle form where it says 'LEDs in series' and simply type in your power sources' voltage, the LEDs' voltage you'd like and the LEDs current capability (use 20mA.) It then tells you what ohmage resistor to stick in the circuit.

Parallel or "How d o I power lots of LEDs off a lower voltage source?"

Let's say you wanted to power three of your brand new LEDs off a 3V battery pack (two 1.5V AA's in series, make sense?) you found lying around. If you were to series the three LEDs there'd be 1V going to each (3 Volts / 3 LEDs = 1V for each LED). That's not enough to power your LEDs! You want them to have the full 3V going to each. Here's how:

parallel101.jpg

How this works is that while every LED receives the same amount of voltage, the current of the source is dispersed between the LEDs. What this means for you is that you have 20 LEDs paralleled off a battery, it's going to drain the battery a lot quicker than if you only had 2 LEDs in parallel. If you're paralleling off a wall adapter, for instance though, the source can constantly renew itself so you can essentially parallel as many as you'd like without fear of draining the wall ;P.

To use resistors in a parallel circuit, say if you'd like each LED above to receive 2.5V instead of 3V, use an LED calculator (make sure you're in the parallel section) to find the right ohmage and then stick it somewhere in the circuit!

"Why do the LEDs have to be the same color?" If you mix colors, say if you paralleled a red (~2.3V) and two blue (~3.5V), the blue LEDs would not light. Why's this? Because the electricity is going to take the easiest path it can to complete the circuit and in this scenario the red LED requires less energy, leaving the two blue unpowered and lonely. To fix this you would need to stick a resistor onto the leg of each LED to 'equalize' all of the LEDs. Note illustration:

parallel2.jpg

To find the resistor you'd need for each LED, use the 'Single LED' portion of an LED calculator , type in the supply voltage, LED's voltage and 20mA for each LED and there you go. Now each LED will turn on and each will receive it's desired amount of power. Thanks to Mike Moorrees for pointing this out, "The resistors act like 'shocks' in a car, they give the power source some 'squish' and let each LED find its happy place (forward voltage)."

LED calculator thanks to Japala:

Courtesy of LSDiodes(Skylar and Chris) Aug, '03

Link to comment
Share on other sites

  • 0

Okay any good bits of info on the hard wire for the Tundra. I traced all wires and cleaned all connectors so it's hard wire time

Link to comment
Share on other sites

  • 0

I just installed some LEDS (Optronics low profile) on my utility trailer. The LED's cases have a ground coming off of each with a ring on it, to use to just tap into whatever is available. I attached mine to the mounting bolts that go through the trailer frame - I had to use slightly larger rings. They work awesome, bright. We put the same style/brand on our main boat trailer a few years ago, and now we don't unplug lights anymore, and wow are the much brighter. LEDs are great.

edit - sorry, I see now you are talking about the brown wire.

tmvikings, not sure of Tundra specifically, but my neighbor has a "camper" wiring gig on his Chev HD, and it has a funky way of wiring that was messed up when he borrowed a friends trailer. Might want to check into that as well. I think he called it a "camper harness" or something. Good luck.

Link to comment
Share on other sites

  • 0

tmvikings, before you do anything you need to find out what is not working and wire. Hard wiring those connections specifically will not necessarily fix the problem if there is no power/ground there to begin with. Remember if this is a factory harness everything will have its own fuse/relays. It is very important to find the source of the problem before you can fix the problem!

Sandmannd, I looked at an LED setup this morning. They have leads that come out of the light assempblies. I would go the route you mentioned and join/solder the three wires together at that point. Then I would use a dual wall adhesive lined shrink wrap (a liberal length on the two wire side would be ideal) to help seal around the two wires.

Lawdog, I have used liquid black tape and shrink wrap together with great success. Solder the connection, apply the liquid black tape, slide the shrink wrap over the still wet liquid black tape and shrink. I like to see the liquid ooze out a little. Otherwise I really like the adhesive lined shrinkwraps for anything that is exposed to the elements.

Link to comment
Share on other sites

  • 0

So I have the rear lights. I know to make a connection at the rear light to run up to the other lights on the trailer. I have three Amber lights on each side of the trailer. To I splice them all to the same wire coming off the light or do I run a new wire to each one?

Jer, I'm not sure what you mean by "Wall Adhesive".

Link to comment
Share on other sites

  • 0

Sorry to jump in on you,Sandmannd,but I want to thank you guys, for this sticky/thread.I was having trailer wiring issues yesterday on my older new trailer.I re-wired the ground to the trailer with a new section of wire- soldering the splice, instead of my old habit of wire nutting the connection,dremeled the connnection spot down to the bare metal, and doggone it, the connection works! Great info,guys. You gotta love stickies like this one. grin

Link to comment
Share on other sites

  • 0

in reference to led lights i installed a set the other week and it had the same wire schematic as regular lights. Installed as normal and it works just fine. in regards to the tundra lights not working with the trailer but the the other truck it works. I would use a test light at the vehichle end to see about power. If nothing there double check connections vehichle side where it ties into tail lights. another problem could be is the hitch ball rusted up, this will cause a break in the circuit. To remedy this I take the ground wire on the trailer end and grind a spot right by the coupler using a grounding washer and self tapping screw it to the trailer.

Link to comment
Share on other sites

  • 0

tmvikings, I moved your question to the Auto info forum.

Link to comment
Share on other sites

  • 0

airjer,

I have a re-occuring problem with my 99 shorelander trailer. Every time I pull my boat out of the water and drive home with the lights on the fuse for my tail-lights blows. It doesn't necessarily blow right away either. Sometimes I can make it all the way home before it blows. Sometimes when I stick a spare fuse in it will immediately blow it out, sometimes it won't blow at all again.

I had a different boat before this one with the same tow rig

(99 gmc yukon) and I never had problems before.

Help!!!!

Link to comment
Share on other sites

  • 0

If your saying you can drive all over Minnesota with the lights on and everything is fine until you back into the water than off the top of my head sounds like a rewire is in order. I would guess that there may be a chaffed or cracked wire that is gaining a ground through the water. Its a long shot but not a bad place to start.

Link to comment
Share on other sites

  • 0

Yep that's pretty much it. I was afraid you were going to tell me that. When you rewire do you run individual wires or do you buy the 4-flat or 2-flat in bulk somewhere?

Link to comment
Share on other sites

  • 0

Wow! does THAT sound familiar! I have been expeiencing that very scenerio for the last 2 months. I also just got this boat then. It is also a Shorelander trailer. never had that problem with my other boat. I have a 99 suburban. Mine didn't seem to have any issues relating to backing into the water.

L2f

Link to comment
Share on other sites

  • 0

AIRJER, I have a small utility trailer that has 5 wires for the lights, but all the plugs I have only have 4. I have tried to wire it, but it doesn't seem to work. HELP!!

Link to comment
Share on other sites

  • 0

What colors are the wires?

You probably have two brown wires (one for each side of the trailer) that need to be spliced together and then into the 4 pin connector.

marine_man

Link to comment
Share on other sites

  • 0

I didn't even see this one yesterday! I like Marines theory on this one. A few harness assemblies will have two brown wires coming out of the trailer side of the plug to make it easier to wire the running lights.

Link to comment
Share on other sites

  • 0

Hi guys,

I haven't checked everything out yet as it got too dark and late to work on it some more but thought I would put this out there and see if someone can come up with some advice before I get home from work tomorrow. I was hooking up the trailer tonight to test it for this weekend trip and the trailer lights would not work at all at first. Changed bulbs and the lights came on but no brakes and no turn signals on the trailer. Truck checks out fine (fuses, harness, etc). When I have the trailer hooked up to the Trailblazer the flashers on the vehicle freeze. Right signal does the same but the left signal works perfectly on the vehicle but again does not get back to the trailer. There seems to be power at the harness but I did not check out the trailer fixtures yet. Is this one of those weird grounding issues?

Link to comment
Share on other sites

  • 0

Kind of sounds that way! The first thing I would do is check all the terminals on the vehicle with the trailer unplugged. Turn on the lights and four way flashers (this will check turn signal/brake function on both wires by yourself assuming you have a flat four connector on the trailer). The pin that is exposed is the ground. You can hook the test light up to this to start. Then check the other three connectors. One will have constant power and the other two will cause the test light to flash. If everything checks out on the vehicle side than you know for sure that its a problem on the trailer end.

Make sure you double check the bulbs that you installed to make sure they are installed correctly and that the buttons on the bottom are making good contact with the tabs in the socket.

Link to comment
Share on other sites

Guest
This topic is now closed to further replies.


  • Your Responses - Share & Have Fun :)

    • jparrucci
      Very low, probably 2 feet lower than last year at ice out.
    • mbeyer
      what do they look like this spring?
    • SkunkedAgain
      I might have missed a guess, but here are the ones that I noted:   JerkinLips – March 27th, then April 7th Brianf. – March 28th Bobberwatcher – April…. MikeG3Boat – April 10th SkunkedAgain – early April, then April 21st   Definitely a tough year for guesses, as it seemed to be a no-brainer early ice out. Then it got cold and snowed again.
    • mbeyer
      MN DNR posted April 13 as Ice out date for Vermilion
    • Brianf.
      ^^^45 in the morning and 47 in the evening
    • CigarGuy
      👍. What was the water temp in Black Bay? Thanks....
    • Brianf.
      No, that wasn't me.  I drive a 621 Ranger. 
    • CigarGuy
      So, that was you in the camo lund? I'm bummed, I have to head back to the cities tomorrow for a few days, then back up for at least a few weeks. Got the dock in and fired up to get out chasing some crappies till opener!
    • LakeofthewoodsMN
      On the south end...   Lots of ice on the main basin, but it is definitely deteriorating.  Some anglers have been fishing the open water at the mouth of the Rainy River in front of the Lighthouse Gap.  The rest of the basin is still iced over. Pike enthusiasts caught some big pike earlier last week tip up fishing in pre-spawn areas adjacent to traditional spawning areas.  8 - 14' of water using tip ups with live suckers or dead bait such as smelt and herring has been the ticket.  Ice fishing for all practical purposes is done for the year. The focus for the basin moving forward will be pike transitioning into back bays to spawn,  This is open water fishing and an opportunity available as the pike season is open year round on Lake of the Woods. The limit is 3 pike per day with one being able to be more than 40 inches. All fish 30 - 40 inches must be released. With both the ice fishing and spring fishing on the Rainy River being so good, many are looking forward to the MN Fishing Opener on Saturday, May 11th.  It should be epic. On the Rainy River...  An absolutely incredible week of walleye and sturgeon fishing on the Rain Rainy River.     Walleye anglers, as a rule, caught good numbers of fish and lots of big fish.  This spring was one for the books.   To follow that up, the sturgeon season is currently underway and although every day can be different, many boats have caught 30 - 40 sturgeon in a day!  We have heard of fish measuring into the low 70 inch range.  Lots in the 60 - 70 inch range as well.   The sturgeon season continues through May 15th and resumes again July 1st.   Oct 1 - April 23, Catch and Release April 24 - May 7, Harvest Season May 8 - May 15, Catch and Release May 16 - June 30, Sturgeon Fishing Closed July 1 - Sep 30, Harvest Season If you fish during the sturgeon harvest season and you want to keep a sturgeon, you must purchase a sturgeon tag for $5 prior to fishing.    One sturgeon per calendar year (45 - 50" inclusive, or over 75"). Most sturgeon anglers are either a glob of crawlers or a combo of crawlers and frozen emerald shiners on a sturgeon rig, which is an 18" leader with a 4/0 circle hook combined with a no roll sinker.  Local bait shops have all of the gear and bait. Up at the NW Angle...  Open water is continuing to expand in areas with current.  The sight of open water simply is wetting the pallet of those eager for the MN Fishing Opener on May 11th.   A few locals were on the ice this week, targeting pike.  Some big slimers were iced along with some muskies as well.  If you like fishing for predators, LOW is healthy!  
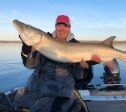
    • Brianf.
      Early bird gets the worm some say...   I have it on good authority that this very special angler caught no walleyes or muskies and that any panfish caught were released unharmed.        
×
×
  • Create New...

Important Information

By using this site, you agree to our Terms of Use and Privacy Policy. We have placed cookies on your device to help make this website better. You can adjust your cookie settings, otherwise we'll assume you're okay to continue.